Delete Button on Keyboard Not Working | Reasons and Fixes
Has your “Delete” button decided it’s had enough and taken an unscheduled vacation? Yes, we’re talking about the delete button on the keyboard not working issue. But fear not, we’re here to unravel the mystery of the “Delete” button on your keyboard throwing a temper tantrum and leaving you hanging.
The “delete” button refusing to cooperate often boils down to either a pesky hardware issue or a software gremlin playing hide-and-seek. And yes, there’s light at the end of this frustrating tunnel. Solutions abound for both these culprits, and they’re easier than you might think.
But why trust a two-liner resolution? Dive into this article, and we promise, by the end, not only will you be equipped to resuscitate that unresponsive “delete” button, but you’ll also be the go-to keyboard guru among your pals. Ready to turn the tables on tech glitches? Let’s roll!

Common Causes for the “Delete” Button Malfunction
There can be several reasons why your delete button may stop working. Here are the most common culprits:
1. Hardware Issues
Your keyboard is a resilient trooper, but it can be vulnerable to some physical mishaps. The most common culprit is the spilled coffee, crumbs that have taken up residence between the keys.
However, other physical factors can affect your delete key. You have to inspect the delete key thoroughly to make sure there are no physical obstructions.
2. Software Conflicts
Sometimes, the “Delete” button throws a fit because it’s not on speaking terms with the software on your computer. Third-party applications or updates can occasionally lead to conflicts that render your key unresponsive.
3. Accidental Settings or Modifications
You may have fiddled with settings that you didn’t quite understand. Well, you’re not alone, as many friends of ours do the same. Accidentally disabling key functions is a common misadventure.
Troubleshooting Methods of a Non-Working Delete Button
Follow these effective troubleshooting methods for a non-working delete button:
Method 1: Hardware Checks
Dust and debris can accumulate under the keys over time. Before you get too deep into the software maze, give your hardware a once-over. Sometimes, it’s the simplest things that cause the biggest problems. Here are the steps to follow:
Step 1: Press down on the “Delete” button multiple times to ensure it’s not just a temporary jam.
Step 2: Disconnect the keyboard from the computer (For laptop users: turn off the laptop), turn your keyboard upside down, and give it a good shake.
Step 3: Alternatively, use compressed air to blow out the gunk.
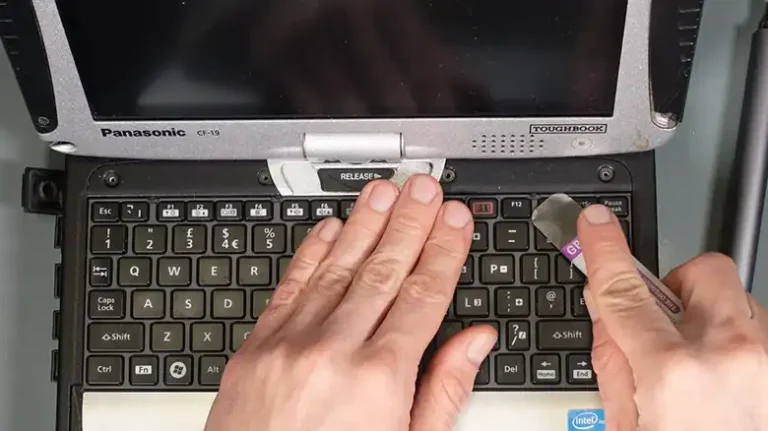
Step 4: Using a keycap puller or a flat tool, gently remove the “Delete” keycap.
Step 5: Use a soft brush or compressed air to clean any debris underneath.
Step 6: Dry out the keyboard using a hair dryer in a cool setting.
Step 7: After cleaning, firmly place the keycap back onto the key switch.
NOTE: If you see any visible damage or any trace of liquid damage, it might be time to consider a replacement or professional help.
Method 2: Software Checks
If your hardware is in tip-top shape, let’s shift our focus to the digital realm. Software conflicts can often be resolved with a few clicks. Here are the steps to follow:
Update Keyboard Driver
Step 1: Go to “Device Manager” on your computer.

Step 2: Find the “Keyboards” section.

Step 3: Right-click on “Standard PS/2 Keyboard” and select “Update driver.”

You can also Visit the manufacturer’s website or use Windows Update to ensure your keyboard drivers are up to date.
Roll Back Update to the Previous Version
If the problem started after a software update, consider rolling back the latest Windows Update to a previous version to see if it resolves the issue. For that,
Step 1: Navigate to Settings > Update & Security > Windows Update and click on View Update History.

Step 2: Click Uninstall Updates to view the list of updates.

Step 3: Click on the latest Windows Update from the list and select Uninstall.

Check for Software Conflicts
Any recent software updates or installations might trigger the issue. For this check recently installed software.
Step 1: Right-click on the Windows Icon and select Apps and Features to navigate to the installed programs list on your computer to identify any recent software installations.

Step 2: Once you have identified the recently installed software, uninstall it and check if the issue is resolved.

If the problem began after a specific software update. You can also try System Restore and consider rolling your system back to a previous state.
Method 3 Check the Keyboard Settings
Sometimes faulty keyboard settings can trigger issues like specific keys are not working. If the “Delete” button of your keyboard is not working, dive into your computer’s keyboard settings.
Step 1: Navigate to Settings > Devices > Typing > Advanced Keyboard Settings.

Step 2: Click on Input language hot keys and Ensure no hotkey combinations have been set that might affect the “Delete” button.

Step 3: If found, click Change Key Sequence… and remove the ‘Delete’ button from there.
Method 4: Use Third-Party Tool
Tools like SharpKeys allow you to remap your keyboard keys. You can assign another key to act as the “Delete” key if needed. For that,
Step 1: Visit the official website and download SharpKeys.

Step 2: Follow the installation prompts and open the program.
Step 3: Choose the key you want to remap (e.g., a lesser-used key) to function as the “Delete” key.

Step 4: Save changes and restart your computer.
Bonus Tips: Things You Can Do If Nothing Works
Sometimes, despite your best efforts, the “Delete” button refuses to budge. In that situation, it’s time to call in the pros. You take your keyboard to the service center in the following situation:
- If you suspect the issue is beyond your DIY capabilities
- If your keyboard has suffered a liquid spill, it might have caused irreversible damage to the circuitry.
- In cases of physical damage, such as a key that won’t click back into place.
Many keyboard manufacturers have their own service centers that specialize in repairing their products. Check if there’s one near you.
Final Notes
There’s no doubt that a misbehaving “Delete” button can disrupt our digital rhythm, turning a seamless typing experience into a tad challenging chore. Whether it’s a sly software snag or a hesitant hardware hiccup, it’s reassuring to know that most “Delete” button dilemmas can easily be solved and dealt with. The fixes might feel tricky but aren’t impossible. if you’ve got more questions or need further assistance, don’t hesitate to drop a comment below. We’re here to help! Thanks for joining us on this keyboard crusade.
Generally Asked Questions
Q: Why is my “Delete” button not working on my laptop?
A: It could be due to hardware issues, software conflicts, or accidental settings changes. Try to remove the dust and debris and check the keyboard driver and settings to fix the issue.
Q: Can I fix my “Delete” button without professional help?
A: In many cases, yes! you can fix your Delete button without any professional help. Simple fixes like updating drivers or using tools like SharpKeys can resolve the problem.
Q: Is there an alternative key for “Delete”?
A: No, there is no alternative to the delete button on the keyboard. However, you can right-click on select delete while deleting any file or folder. Again, depending on the system and configuration, you can use “Fn” + “Backspace” or other key combinations to delete.
Q: Can software updates affect my “Delete” button functionality?
A: While rare, some software updates might cause key conflicts. For this, you can try rollback the driver or the latest software update on your computer. However, it’s always best to have the latest keyboard drivers installed.

![[Fixed] Logitech Keyboard Blinking White Light](https://keyboardhunter.com/wp-content/uploads/2023/08/Logitech-Keyboard-Blinking-White-Light-768x431.webp)


