Razer Keyboard Key Stuck? Solutions Here
I just spilled my late-night coffee all over my Razer mechanical gaming keyboard! Now the “W” key is sticking like crazy when I try to move forward in FPS games. It keeps repeating nonstop, driving me nuts! Between my clumsy drinks and my cat’s fur getting trapped under there, some gunk must be jamming the key mechanism. I can’t afford a shiny new keyboard though.
Can you picture yourself with the same kind of issues with your Razer keyboard? If yes, then here your Angel of the Dark, will help you out today from such an irritating issue.
Based on my experience repairing keyboards, I always recommend first giving a thorough cleaning and updating all firmware. If keys continue sticking, replacing individual switch components is straightforward for most Razer mechanical models. With some targeted troubleshooting and DIY maintenance, a sticking key doesn’t have to mean the end of your prized Razer’s lifespan. Now let’s explore these solutions in detail…
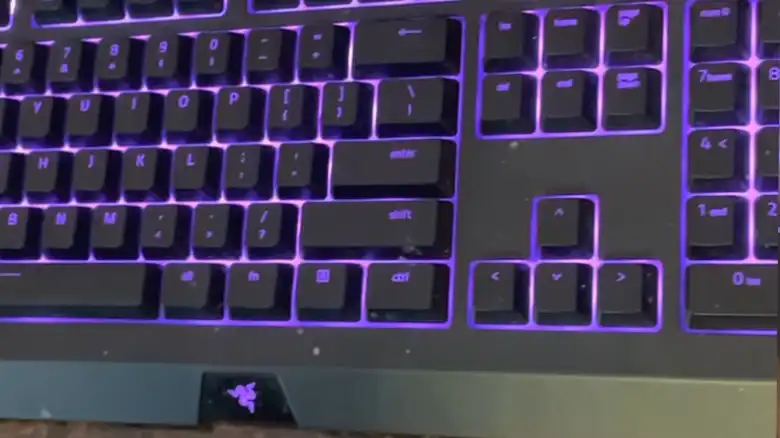
Why Key Stuck on Razer Keyboard?
It can be extremely frustrating when a key gets stuck on your Razer gaming keyboard. A sticky key interrupts gameplay and impacts your performance. There are several potential causes for a stuck key on a Razer keyboard:
Dust and debris – This is one of the most common reasons for a stuck key. Dust, crumbs, pet hair, and other debris can get lodged under the keycap and prevent the key from returning back up after being pressed down. Over time, enough gunk builds up to jam the key.
Spilled liquids – Accidentally spilling a drink on your Razer keyboard can lead to sticky keys if the liquid seeps under the keycaps. The liquid residue leaves behind sugars and minerals that prevent the key mechanism from working smoothly. This is especially common with sugary drinks like soda, juice, or coffee.
Faulty switch – Each key on a Razer mechanical gaming keyboard has an individual switch underneath. These switches can sometimes become defective or get damaged, causing keys to get stuck in either the down or up position. This typically occurs after heavy long-term use.
Software issues – Although less common than physical issues, occasionally a stuck key on a Razer keyboard could stem from a glitch or bug with Razer Synapse software or device drivers.
No matter the cause, a repeating sticky key is beyond annoying when you’re trying to pwn enemies or cast spells. But don’t worry – in most cases this issue can be easily fixed by cleaning or troubleshooting your Razer peripheral.
Fixations for Key Stucking Issue on Your Razor Keyboard
Here are some solutions for dealing with stuck keys on a Razer keyboard:
Clean the Keyboard
The first step is to give your Razer keyboard a thorough cleaning to remove any dust, crumbs, pet hair, or spilled liquids that could be trapping a key.
- Unplug the keyboard first before cleaning.
- Use a can of compressed air to blast away debris from under the keycaps. Tilt the keyboard during cleaning to dislodge particles.
- Use a cotton swab dipped in isopropyl alcohol to scrub away gunk if compressed air doesn’t do the trick. Be gentle when inserting the cotton swab around and under the keys. Let dry fully before reconnecting.
- As a last resort, pop off the keycaps and clean the exposed switch housings. Look up tutorials specific to your Razer model for keycap removal instructions. Reattach keys carefully by pressing down firmly after cleaning.
A good deep cleaning often frees up sticky keys clogged with built-up crud. Just take care not to get moisture inside the actual keyboard interior when wiping down keys.
Change the Switch (If You Own Hotswappable Keyboard)
If cleaning doesn’t fix the issue, the underlying keyboard switch itself might need replacing on that stuck key. Switches on Razer mechanical keyboards are removable/replaceable.
- Order a replacement switch that matches the type of switch originally in your Razer model – either Razer Green, Orange, Yellow, or Optical.
- Watch video tutorials to properly remove and insert a new switch. Use a switch puller tool.
- Be extremely gentle when handling ribbon cables to avoid any tears or damage.
- Snap in the replacement switch and reconnect the keycap. Test key to confirm normal function.
Installing a fresh switch restores smooth keystroke action if the old switch becomes defective from heavy gaming usage and abuse over time. This DIY fix costs just a few dollars.
Update Your Keyboard’s Firmware
Outdated keyboard firmware can sometimes cause glitchy behavior like stuck keys too.
- Open Razer Synapse and go to Settings.

- After that, click on Firmware, and then Select your Keyboard and update the firmware.

Besides the Synapse, you can directly download the firmware updater from the Razer website and can update the firmware from the settings. This firmware update ensures that the key spamming or stuck issue will be resolved by updating. For example, if you own a Razer BlackWidow V3 Pro RZ03-03530 model, then the Firmware v3.02.01_r1 updater will help to solve the issue.

Download the updater and then connect the keyboard to your device. After that, launch the updater, and click on Update.

Updating firmware ensures compatibility, patches bugs, and improves performance. It often resolves keyboard issues caused by problematic firmware.
Update Razer Synapse
Similarly, also make sure you’re running the newest version of Razer Synapse software. Software bugs and crashes might affect keyboard function.
- Exit out of Synapse completely
- Navigate to Razersupport.com and find the Synapse download page
- Download and install the latest release.
You can also update the Synapse from the Settings. To do so, go to Settings > About > Check for Updates. If there are any updates, you can download and update the software from there.

Keep Synapse updated to prevent conflicts with keyboard firmware that contribute to stuck keys.
Do a Clean Installation Of Razer Synapse
If updating Synapse doesn’t help, try uninstalling it completely and then doing a fresh clean install:
- Press the Windows key and type Add or Uninstall.

- After that, look for Razer Synapse, and then Uninstall it.

- Restart your computer
- Re-download the Synapse installer and select the install when prompted.
This will wipe leftover registry files and drivers to eliminate any corrupted Synapse remnants messing with keyboard performance.
Plug The Keyboard Directly Into The Computer
If you normally have your Razer keyboard connected through a USB hub/splitter or monitor port, try instead plugging it directly into a rear motherboard USB port on your computer itself.
Connecting through an intermediary device can sometimes cause power or signaling issues leading to missed or stuck keystrokes. Rule this out by eliminating daisy chaining.
Disable Razer Synapse To Isolate The Device From A Software Issue
If a software conflict with Synapse seems like the potential culprit:
- Right-click the Razer Synapse icon in the system tray.

- Select Exit Synapse (for Razer Synapse 3) or Close Razer Synapse (for Razer Synapse 2).

- Restart your PC
- Test using the keyboard without Synapse active and see if the stuck key issue still happens
If the problem goes away when Synapse isn’t running, then reinstalling Synapse fresh often resolves the software incompatibility.
Alternative Way (If the key is still stuck)
If you’ve exhausted all troubleshooting steps above and the key remains stuck, a couple of last-ditch options exist:
Disable or Remap the Key to a Different Key (Use PowerToys)
If that one key keeps sticking despite your best efforts, you can optionally:
Disable the key entirely – Open Microsoft PowerToys and use the Keyboard Manager module. Select the stuck key from the left box, select the Disable option in the right box, and lastly, click on OK. This prevents any input from reaching that key at all until you re-enable it.


Remap the key to an alternate key not used often or mapped already to a less critical function. For example, map a sticking F4 key to the nearby F7. Test if the remapped key exhibits the same sticking.


Either disabling or remapping stops the endless cycle of a repeated stuck keypress in games or typing. It works around the physical issue without replacing the whole keyboard. Though the stuck key may still not function right mechanically, remapping lets you avoid the problem key bind entirely.
People Also Ask – PAA
Does using a can of air to clean the keyboard void the warranty?
No, using compressed air to blow dust out from under keycaps does not void Razer’s warranty policies. Just don’t directly spray liquids or moisture into openings. Be gentle cleaning around fragile ribbon cables too. Avoid bending or tearing.
Can I lube switches on a mechanical Razer keyboard?
Yes, lubricating mechanical keyboard switches with a thin layer of Krytox grease can improve feel and reduce sticking. But opening up switches does void the warranty. So only lube out-of-warranty boards. Follow guides specific to your model. Over-lubrication can also attract more dust buildup.
Is it safe to use isopropyl alcohol when cleaning a Razer keyboard?
Yes, rubbing alcohol is generally safe for cleaning Razer keyboards when used properly on external surfaces. Just don’t allow liquid into interior openings. Let surfaces fully dry before reconnecting power as well, to prevent potential shorts which can damage electronics.
Should I replace all the switches on my Razer keyboard if one goes bad?
Not necessarily initially. First, just swap out the individually sticking switch if the issue seems isolated to just that key. But if multiple switches start failing down the road which indicates a systemic issue, replacing all switches may help restore your aging keyboard before problems spread.
Can I replace the mechanical switches on an optical Razer keyboard?
Unfortunately, optical gaming keyboards from Razer do not allow replacing individual mechanical switches. The optical light beam mechanism is integrated into each keycap. You would need to replace the entire keyboard if multiple keys start failing on an optical model.
Final Thoughts
Stuck keys can certainly make your exceptional Razer keyboard perform poorly and feel cheap. But in most cases, the problem can be easily solved with some basic cleaning and maintenance, software and firmware updates, switch replacements, or key remapping. Just be patient and methodical in your troubleshooting. With some TLC, you can get your prized gaming keyboard back to working order quickly.
Hopefully, these solutions help get your sticky Razer keyboard keys back in action. Game on! Let us know in the comments if you have any other handy fixes for stuck Razer keys.

![[Fixed] Mini Keyboard Not Working with Android Box](https://keyboardhunter.com/wp-content/uploads/2023/10/Mini-Keyboard-Not-Working-with-Android-Box-768x431.webp)